Sunday, August 26, 2012
Thursday, July 12, 2012
A Real Self-Starter
Seen on Jalopnik:
Volkswagen Van Drives Itself Into Condo While On Fire
This article affirms the stories. If your battery has enough juice, an electrical fire can trigger the starter and subsequently start your engine. And if your standard transmission vehicle is in gear (you should totally park in a forward gear when parked on a hill, as this van was), it will drive on it's own. Hopefully with the ebrake on it won't go very far... especially because it's ON FIRE. Oh man.
Friday, March 23, 2012
Subaru BRZ review
Subaru BRZ: It's Thinker Than You Fast It Is
http://online.wsj.com/article/SB10001424052702304724404577293812942708538.html
http://online.wsj.com/article/SB10001424052702304724404577293812942708538.html
Labels:
subaru
Sunday, March 18, 2012
LA Times goes on a Bus trip
Smiles and smiles to go in a VW bus
By Kari Howard, Los Angeles Times
Sun Mar 18 2012 12:00 AM
The first smile came from the mechanic at the Jiffy Lube at the bottom of the hill. You know you're on to something good when you can make a tired guy light up, even if it's just for a second, at the end of a long workweek.
By the time the weekend was over, we'd amassed way too many smiles to count and moved on to peace signs. (My favorites: from the surfer who looked like a bleached-blond Jesus and the panhandler who carried a sign saying, "I won't lie. I need beer.")
I'd like to think it was because we gals were so fetching, but I must admit it was probably — OK, certainly — the thing we were riding in: a spring-pea-green vintage VW camper with a paint job so shiny you could imagine that it was 1979 and that we'd just driven it off the showroom floor.
It was my birthday, and I wanted to do something different this year. VW buses have always been a personal good-luck charm; I make a wish whenever I see one. So when I found an outfit in Orange County called Vintage Surfari Wagons that restores and rents them, I knew it was time for a vintage VW road trip up the Southern California coast.
Sunday, March 4, 2012
Rebuilding heads
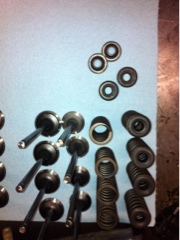
Thought I'd post some photos from last week when we rebuilt a bunch of cylinder heads.
Begin with a clean, machined head with surfaces and guides that are to spec. Using compressed air, blow out passages to ensure cleanliness.
Lay out your parts, checking spring is right side up and all parts are accounted for. Check valve seat for surface quality.
1. Install valve stem seals.
2. Insert lubricated valve.
3. Lubricate area then place spring and spring retainer in position.
4. Using valve spring compressor, place keepers (using grease as "glue") then slowly back off to seat valve.
5. Test that valve is installed correctly by hammering end with a rubber mallet.
 |
| Starting to lay out all my parts: here are valve spring retainers, springs, and valves |
 |
| Springs with retainers; keepers; valve stem seals; valves |
 |
| The head resting on the blue-towel covered work bench |
 |
| Blob of grease on my non-dominant hand for lubing valve stem and holding the keepers |
 |
| The head has been assembled (but not yet wiped off) |
Subscribe to:
Comments (Atom)
